

How to Set Up a Bell Tent: Step-by-Step Guide
Last Updated: October 30, 2026
Quick Summary
To set up a bell tent, first lay out all parts and groundsheet on a flat, dry, clear site. Raise the center pole with a helper, fit the canvas over it, install the door pole, then secure the perimeter pegs and guy lines and tension the canvas evenly.
- Check every part is in the bag and look for tears or missing pegs before you leave home.
- Choose a flat, dry site clear of sticks, stones and roots to protect the groundsheet.
- Use a helper when raising the center pole to make the job faster and safer.
- Tension guy lines evenly in small steps, working from one side to the other.
Table of Contents
- What You Need Before You Start Pitching
- Preparing a Flat, Dry Site and Laying Out the Groundsheet
- Bell Tent Setup Instructions: Raising the Center Pole and Door Pole
- How to Secure Bell Tent Guy Lines and Tension the Canvas
- Bell Tent Setup Checklist for Wind, Weather and Ground Types
- Common Setup Problems and How to Fix Them
- How to Pack Away a Bell Tent After Use
- Planning Your First Pitch With the Right Groundsheet
- Frequently Asked Questions
What You Need Before You Start Pitching
Setting up a bell tent is simpler than most people expect, but a little preparation makes the job much easier.
Start by checking that every part is in the bag. Lay the canvas out on a clean surface and look for tears, worn stitching, or missing pegs.
Your groundsheet protects the floor of the tent from dirt, moisture, and bugs. A ground tarp designed for bell tents, such as the Ground Tarp, is a practical choice.

Here is a quick list of what to pack:
- Tent canvas and fly sheet
- Center pole and door pole
- Groundsheet or ground tarp
At Outdoor Wilderness Supply, we recommend laying everything out before you start. A clear plan turns a confusing afternoon into a calm, repeatable routine.
Preparing a Flat, Dry Site and Laying Out the Groundsheet
The ground you choose matters more than most people realize. Look for a flat, dry area that is clear of sticks, stones, and roots (Finding and Setting Up a Campsite).
Walk the site before you unpack. Check for low spots where water could collect after rain.
Once the site is clear, lay the groundsheet out flat. Position the door where you want it to open.
Watch out: Check the surface before you lay the groundsheet down, since wet or uneven ground can trap moisture under the tent.
Peg the groundsheet at the corners first, then work around the perimeter.
Bell Tent Setup Instructions: Raising the Center Pole and Door Pole
This is the step that gives the tent its shape. Work with a helper if you can.
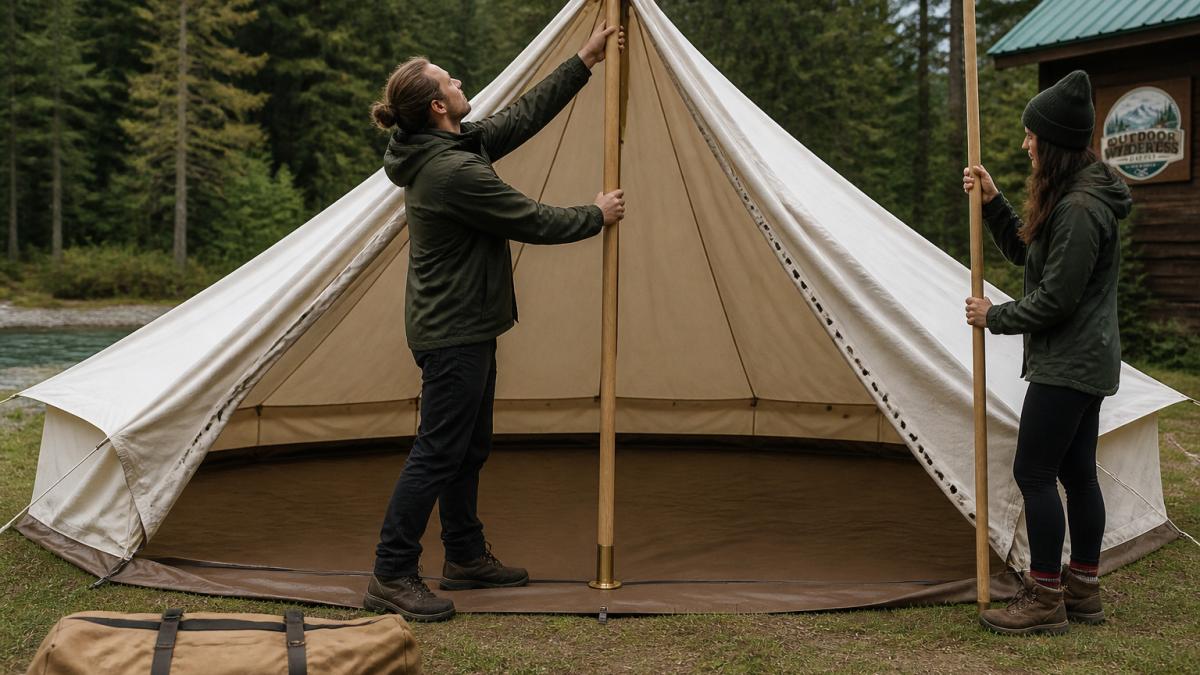
Begin by fitting the center pole.
Next, install the door pole. Position it at the entrance and fit it into the canvas so the door opens cleanly.
If your kit includes a fly sheet, such as the Bell Tent Fly Sheet, fit it now.
Here is a summary of the setup order:
| Step | What You Do | Who Helps |
|---|---|---|
| 1 | Stand the center pole upright | Helper steadies the canvas |
| 2 | Fit the canvas over the peak | Both people lift together |
| 3 | Install the door pole | One person holds the door |
| 4 | Attach the fly sheet | Optional, per tent model |
Check the alignment as you go. A crooked pole throws off the whole pitch.
How to Secure Bell Tent Guy Lines and Tension the Canvas
Guy lines keep your tent stable in wind.
Tension the canvas evenly. Tighten the lines in small steps, moving from one side to the other.
Pegs need to go in firmly. Use a mallet to drive them at a slight angle away from the tent.
Finally, step back and look at the shape. The walls should look taut, and the door should swing freely.
Bell Tent Setup Checklist for Wind, Weather and Ground Types
A bell tent that pitches fine on a calm, dry lawn can fail in sand, hardpan, or a gust front. Use this checklist and the adaptations below before you call the tent finished.
- Ground is flat and dry, or the groundsheet is protected from water
- Center pole is upright and straight
- Door pole is square and the door hangs evenly
Watch out: Do not pitch in strong wind without a helper and fully secured guy lines. Gusts can lift an unsecured canvas quickly.
Adapting pegs and anchoring to the ground
Peg choice matters more than most guides admit. A peg that holds in loam will pull straight out of sand.
- Soft or sandy ground: Use longer, wider pegs (often called sand pegs or auger pegs) and drive them at a 45-degree angle away from the tent. If the soil is loose, bury a small anchor log or stuff sack filled with sand and tie the guy line to it. Stake guy lines through a wider area rather than a single point.
- Hard or rocky ground: A mallet and a pilot hole (a thick nail or spike) help pegs go in cleanly without bending. Choose pegs suited to rocky ground, since some materials bend more easily than others.
- Frozen or very compacted ground: Warm the peg tip or use a metal spike to start the hole. Expect to re-tension guy lines as the ground thaws and softens.
Wind limits and storm precautions
Check your tent's wind rating with its manufacturer before pitching in strong wind, and consider adding guy lines or reconsidering the pitch when conditions are gusty. If a storm is forecast, double the guy lines on the windward side and lower the center pole slightly to reduce sail area. Never pitch in lightning or in wind strong enough to lift the canvas before the center pole is secured.
Rain and water management
- Pitch on high ground, not in a low spot where water collects.
- Keep the groundsheet edge turned under or tucked so rain does not run under the tent.
- Check that guy lines are tensioned before rain; wet canvas stretches and sags.
Setup variations by tent size and design
Not every bell tent pitches the same way. Check your model before you start:
- Removable groundsheet: If the groundsheet clips in rather than being sewn in, peg the groundsheet first, then raise the canvas over it. This keeps the floor flat and makes cleanup easier.
- Stove jack: If your tent has a stove jack, confirm the jack is closed and the flap secured before you raise the center pole. A loose flap can catch wind.
- Manufacturer pole and peg systems: Some tents use a single-piece center pole; others use a sectional pole with a top cap. Follow the maker's order, forcing a sectional pole can crack the ferrule.
- Size: Larger tents generally need more perimeter pegs and a helper on the center pole can make setup easier. Smaller tents can often be pitched solo, but the door pole still needs a second check for square.
Common Setup Problems and How to Fix Them
Most setup problems have a specific cause. Work through these diagnostics before you re-peg the whole tent.
The tent looks lopsided or the center pole leans
- Check the pole base first. If the center pole is not sitting on its base plate or is sunk into soft ground, the whole tent leans. Reset the base on firm ground or a flat stone.
- Check guy-line tension on the high side. A slack line on one side pulls the peak toward the other. Tighten the lines on the side the pole leans toward, in small steps.
- Check for a bent pole. Roll the center pole on flat ground. A wobble means it is bent and should be replaced, not forced.
The canvas sags between pegs or walls look uneven
- Loose pegs are the most common cause. Walk the perimeter and push each peg; a peg that moves needs to be reset deeper or at a better angle.
- Re-tension in small steps. Tighten one guy line a quarter turn, then move to the opposite side. Working around the tent evenly prevents pulling the canvas to one side.
- Wet canvas stretches. If it rained during setup, expect sag and re-tension once the canvas dries.
The door will not close or align
- Check the door pole for square. The door pole should sit vertical and parallel to the center pole. If it leans, the door will bind.
- Check the groundsheet under the door. A wrinkled or bunched groundsheet can lift the door threshold. Smooth it flat.
- Check canvas tension at the door. If the walls beside the door are over-tightened, the door opening distorts. Loosen the two guy lines nearest the door slightly.
Pegs are stuck or will not drive in
- Stuck pegs: Twist the peg as you pull rather than yanking straight up. A pair of pliers or a peg puller saves fingers.
- Pegs that will not drive: You have hit rock or hardpan. Move the peg a few inches and try again, or use a pilot hole. Do not hammer a bent peg, it will not hold.
Water pools on the groundsheet or under the tent
- Check for low spots. If water pools inside, the site is not flat. Repitch on higher ground or dig a shallow drainage channel on the uphill side (check local rules before digging).
- Check the groundsheet edge. If the edge is buried or turned up, water runs under the tent. Tuck the edge under or use a ground tarp sized to the tent.
- Check guy-line tension before rain. A slack canvas sags and creates a pocket where water collects.
Many people find that a slow, repeated check of each step saves time. Pitching a bell tent is a skill that improves with each use, and most problems trace back to one of the causes above.
How to Pack Away a Bell Tent After Use
Take the tent down on a dry day if you can. Damp canvas can mildew, so let it dry fully before you store it.
Remove the pegs and guy lines first. Then lower the center pole carefully, with a helper if possible.
Store the canvas, poles, and groundsheet in separate bags. Keep the tent in a cool, dry place away from direct sunlight.
Planning Your First Pitch With the Right Groundsheet
Your first pitch goes more smoothly when you choose the right groundsheet for your tent size. A groundsheet that is too small leaves edges exposed.
For a 10' bell tent, the 10' Regatta Bell Tent Ground Tarp is sized to match. For a 13' bell tent, the 13' Regatta Bell Tent Ground Tarp gives you the right coverage.


Practice your first pitch in a calm spot before a trip.
Frequently Asked Questions
How long does it take to set up a bell tent?
A first-time pitch usually takes one to two hours, including clearing the site, laying the groundsheet and tensioning the guy lines. With practice and a helper, setup usually gets quicker. Setup time depends heavily on the tent size, since a 13-foot bell tent has more canvas to lift and more pegs to set than a smaller model. Working in calm weather and having all pegs, poles and a mallet laid out before you begin will shorten the process considerably.
What should you put under a bell tent?
Lay a groundsheet or ground tarp under the tent to protect the floor from dirt, moisture, stains and insects. Outdoor Wilderness Supply offers polyethylene ground tarps, including a 10-foot Regatta Bell Tent Ground Tarp at $70.00 and a 13-foot version at $85.00, both with loops around the edge for easy staking. Make sure the tarp sits inside the tent's footprint so rain cannot collect and run underneath the canvas.
How do you secure a bell tent in windy conditions?
Make sure every guy line is attached and tensioned evenly, and place pegs at a shallow angle away from the tent so they grip firmly in the ground. Check the guy lines again after the first few hours, since canvas can stretch and pegs can loosen as the fabric settles. If wind picks up, lower the tent's exposure where possible by pitching with the door facing away from the prevailing wind, and avoid pitching in exposed open ground.
How do you pack away a bell tent?
Start by letting the canvas dry fully, since packing a damp tent leads to mildew. Remove the pegs and guy lines, lower the center pole and door pole, and fold the canvas in the order it was laid out, working from the top down and keeping the fabric smooth. Roll or fold it loosely so it does not crease sharply, then store it in a dry, ventilated bag.
